Sunday, January 30, 2011

How to make my tomato soup

If you've been reading along, you should have known that I am again sick in bed...ugh...but being sick means I get to eat soup all the time! I simply love soup and I wanted to share with you how I make tomato soup (from a can) my own. 
From the can, the soup can become rather boring and blah...so here's how I jazz it up using things I already have in the cupboards. 


Old Blog, New Blog

So I was sitting in bed (sick) this morning and thought... "you know what! this would be a great time to give the blog a little face lift." And it's something I could do while resting!
So here's the old...


And you are now admiring the new and cleaner looking Miss Yellow Shoes Blog!
Do you like it? 

Saturday, January 29, 2011

Ooodles and Ooodles of Doodles


Since my last post...

I've gone back to work at the daycare (part time). 
I'm so happy to be back with all the kids. I really missed them a bunch!

I've been a busy little bee crafting away as well. I've been crocheting flowers pins like there's no tomorrow. (you can find those in the shop by Monday)

In addition to going back to work and crocheting away a storm (and catching a cold from the kids) I've also been doodling away!

Before...


After!

Before...


After!

Before (I think this is my favorite one...)


After!


Maybe this last one will be my new logo or featured in a new banner.

What's next on my list? These!


Stay tunned for the upcoming tutorials!

Sunday, January 23, 2011

DIY Blog Clip-art

In my last blog post I used this image..


Would you like a tutorial on how to make your own?
Well lucky You, that's what this post is!


First, sketch your image with a blank sheet of paper (the notebook paper with lines won't do the job).
Try not to fill in anything. Remember you'll be adding color in later so there isn't much need for shading
Next, take a picture. Make sure your camera is directly over your sketch or else you'll get some funny angles in your final piece. 


Now upload your picture to Picnik or you can also use photoshop if you like. 
Brighten up your picture like this, making sure not to make your black lines disappear. 


Now use the "doodle" in picnik to add color to your image. The possibilities are endless here so have fun!

I added a little thought bubble to mine. You can do that with the "stickers" in picnik. 
The last step is to save your image to your computer and then upload it to your blog!


This is another one that I made today...


Valentine DIY

Whether or not you love it or hate it, Valentines Day is on its way.
If you have that special someone to share it with then congrats to you!
If you don't, that doesn't' mean that you can make a little something something for those around you who you love!


Not just one Valentine Tutorial, but several!
I would like to share some sweet crafts I found on Martha Stewart's website.


These are crayon hearts that would look great in any window! I would also make these in flower shapes for spring... (click the image to see the tutorial) 


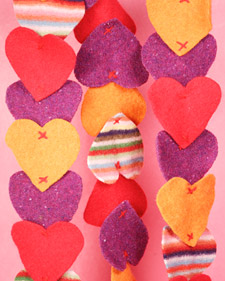
You can't go wrong with garland. And the great thing about using felt is that you don't have to hem anything or worry about it coming apart! 


Here's a great way to recycle! Use those plastic bags that you have laying around the house to make something pretty and sweet. 


These Lace Votive Holder's are just so pretty and elegant that I decided to post the whole tutorial right here.

"Create sturdy candleholders from lace saturated with fabric stiffener. Fitted with tea lights in glass containers, these luminarias can be positioned alone or in groups around a room or along a mantel for instant ambience."

Use rectangular pieces of lace in several sizes to make a variety of votive holders. The long side of the lace will determine the circumference of the finished item. We used pieces that were 5 inches wide and 14 to 21 inches long. We like guipure for this project, because it has a large and distinct motif, but any medium- to heavy-weight lace will work. 


1. Cut lace into a rectangle in the desired size. Trim one of the long sides, which will be the top of the votive holder, following the lace's motif. Sew across the bottom with a loose running stitch and connect the 2 ends. Pull the thread, gathering the bottom into a tight circle, and knot. Whipstitch the short sides together. 


2. Place a balloon inside the lace, and then blow it up to fit the lace's dimensions. Set the balloon upright in a paper cup so the lace form is upside down. Arrange the gathered lace to create an even bottom. Spray with fabric stiffener until saturated. Let dry. 


3. Pop the balloon.


Last year, I made a bunch of paper valentine cards to sell. I had advertised them in my dorm and they all sold the night before the 14th! So crazy...


So tell me...what are you doing this Valentines day?

Friday, January 21, 2011

Shop Announcement


I wanted you all to know that I now have an online shop where I sell my handmade creations!
I am so excited about this!!!!


Monday, January 17, 2011

Snowflakes minus the mess and cold

Do you remember sitting on the floor with a pair of scissors in your hand making paper snowflakes? I always loved trying to make pictures inside my snowflake; and I loved how each one was special and unique.
Well I found an online snowflake maker!
You can make any kind of snowflake that you want using diffrent folding techniques, sciccors, stamp cutters, markers, and more!
After you're finished with your little creation, go ahead and print it out. Isn't that awesome?
Here are some of my snowflakes...


Click here to make your own pretty snowflakes.