Friday, March 1, 2013

Interactive Bulletin Board DIY

Hello dear readers and fellow teachers,

I wanted to share this little bulletin board diy with you!
It's an enjoyable review game, and the kids love interactive with the visuals.


First, I stapled pink fabric to my board and added some thick velvet ribbon as a border.
I love using fabric on bulletin boards for two main reasons.

1. The kids love the texture.
2. You can re-use the fabric for years and years.

Then, I printed out "Scoop Up the Alphabet" in a fun font. Of course you can change the title to anything you want. 

Next, I drew a fun character with a giant ice-cream treat and painted him in with water-colors. Then I drew and cut out some ice-cream cones and ice-cream scoops from pretty scrap-booking paper. I wrote lower case letters on the scoops and upper case letters on the cones. The goal is for the kids to match the lower and upper case letters.


I mounted up all of the pieces along with a little baggie to hold the scoops of ice-cream. 
I made clear little pockets for the scoops out of left over laminating plastic. The kids just slid the scoops into the pockets and have me check their work.

Love it?
My students do!

So you might be sitting there thinking...

"That's really cool but what if I can't draw to save my life??"

No worries friends. I've already got a diy on how to draw just about anything with a projector.
Follow this link here and you'll be on your way to teacher happiness! 

Happy Friday!


Saturday, January 12, 2013

How to turn a stuffed animals into a puppet

I am a firm believer that every education major (from preschool to elementary) should be handed a puppet while crossing the graduation platform. 
Alas, this is not the case. So tonight I will teach you how to turn an ordinary stuffed animal into the perfect teaching tool.


You'll Need:

-a stuffed animal 
- scissors
-needle and thread
-fabric

Now this photo is not for the faint of heart.


You're first step is to cut a slit into the bottom of the animal. Make sure the slit is long enough for your hand to fit through.
Remove some of the stuffing but leave enough in for the animal to hold it's shape.


Now cut a square (large enough for your hand) out of the fabric. Sew along three sides.


Its okay if your stitching is ugly. It will be hidden inside your stuffed animal's body.


Now stuff your square, wrong side out, inside the slit and sew along the edge.


Once your fine and dandy stitches are done, your work should look like this.
Give yourself a pat on the back!


Add a bow or two as a final touch...


There you have it!
Your very own customized puppet ready to teaching! 


Sunday, January 6, 2013

Wedding Card Book DIY


Sigh, what to do? What to do with all of those beautiful wedding cards?
The ceremony is over. You've returned from your fabulous honeymoon and you find over a hundred cards waiting for you on the counter.
Here's a simple solution for the sentimental girl, turn them into a keepsake book. 
No, you won't pull it off your self every day. But once in a while you'll find yourself browsing through the little notes and be glad that you kept them. 
-------
You'll need:

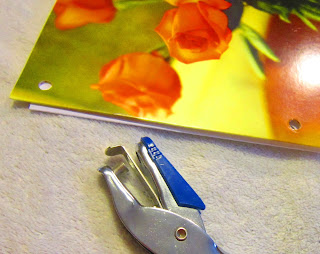
-hole punch
-ribbon (your wedding color perhaps)
-scissors
-candle


Step one is to punch two or more holes in the cards. To make sure all of my cards lined up correctly, I used one card as my master. I slid one card at a time under the master card before I punched the holes. 


Some cards are very thick. You'll either need a lot of elbow grease to get the punch through, or try to punch one layer at a time. This particular card was lightly glued together. I was able to lift one layer at a time and punch through with no difficulty. 


What about those tini tiny cards you ask? Just punch a hole in the middle of the card and they'll be just as dandy.


Is your hand sore yet? 
No worries, we're jumping right into the fun step.


When you start "sewing" everything together, do not thread one set of holes at a time. This will only cause you great headache.


Threading both sets of holes at the same time keeps all of your cards neatly stacked while you work. 
So much easier and much friendlier to you as the busy new wife.


Here's a photo of one of the smaller cards in the stack.


Of course you've set aside your favorite card while "sewing" everything together. And now it the time to add it to the top of the stack. This card will act as your cover so make sure it's beautiful!


Tie a double knot loose enough to flip through the cards but tight enough to hold everything together.


Once you have your bows at the proper tightness, burn the edges of the ribbon just a tad with a candle. 
This will keep the ribbon from falling apart.


Congratulations you little crafty wife!
Be sure to store this little treasure with your wedding album.


Tuesday, January 1, 2013

What I want in 2013: in photos


I want to keep my "new-teacher" enthusiasm up and constantly bring new ideas to my classroom. 


I find drifting off into those pages quite relaxing, so this year I would like to read at least 10 books. 


Sometimes the best coffee shop is the one that no one knows about. This year I want to visit more nooks and hole-in-the-wall type places. 


2013 will be the year that I crochet myself a sweater! Thanks to my mother-in-law, I will be visiting Ravelry.com for help.


I would love to create a work of art to hang in my home. Maybe this year I'll get a chance.


Lastly, I want to get a pet. 
It doesn't have to be fluffy, but reptiles are off limits!


Happy 2013!
Anyone else out there care to share their hopes and dreams?


Thursday, December 6, 2012

Well this could be fun...


I am now officially on Instagram!
I'm still learning what all of the buttons are, and I'm still learning how to take photos in bad lighting...
But go ahead and follow me, and leave a note so I can follow you back!

My user name is MissYellowShoes of course.

Wednesday, December 5, 2012

Easy Peasey Healthy Meal


Hummus, avocado, tomato, and delicious bread.
Could you ask for anything more?

Healthy doesn't have to be yucky. (that's what I always thought) 

I made this meal for Mike and I a few days ago and I can rate this open faced sandwich 5 golden stars!
I made these bagels from scratch and replaced the regular bread with the bagel bread. 

(psst! I added some Italian herbs to my dough)

It's a quick meal.
It's a delicious meal.
You try it and let me know how many stars you'd rate it.

Monday, December 3, 2012

Baby Steps


"Mrs.Girr, you have chubby cheeks"- little girl from preschool
(true story)

I'm taking those first few baby steps towards a healthier lifestyle. I figure that it will take me quite a while to reach my goal weight and to have a healthier body. 

Maybe that's why I've been fearful of taking on a healthier lifestyle. It's just easier to eat whatever I'm craving, and eating what I want gives me satisfaction immediately. 

I've had the fear of failure in front of me for too long. I've feared that I'll work so hard and deny myself so much only to have nothing to show for it.


So here I am, taking my baby steps. 

Stay tuned.