
These would make cute gifts...or a fun craft to do with little ones while they visit for the holidays.
The sock monkey's most direct predecessors originated in the Victorian era, when the craze for imitation stuffed animals swept from Europeinto North America and met the burgeoning Arts and Crafts Movement. Mothers there took to sewing stuffed animals as toys to comfort their children, and, as tales of the Scramble for Africa increased the public's familiarity with exotic species, monkey toys soon became a fixture of American nurseries. However, these early stuffed monkeys were not necessarily made from socks, and also lacked the characteristic red lips of the sock monkeys popular today.
I found some sock monkey/creatures tutorials for you! Just click on the picture for instructions.


This squirrel wasn't made out of a sock, but a glove!


I just made this graphic for the blog last night and I am so excited for you to see it!!!

Tadaaa! Now let's learn how to make an owl of of socks together...

I’m using the leggings sock… the one that goes from your ankle up to your knees.
See photos below from left to right.
Measure 5″ from the rubber and cut. We only need this part, the rest can be kept for other toys  .
.
Turn the sock around and sew a straight line on the rubber part. This will be the head / ears of the owl.
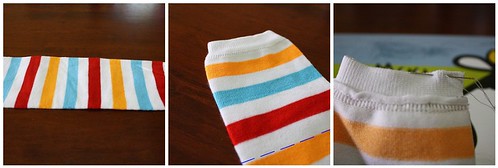
Ones done, go to the other side (where we cut just now), and fold the opening into 3 section like the photos. (sorry I don’t really know how to explain). What I am trying to do here is the tail, and legs of the owl.
The section that I am holding in the photo is about 1 cm and it’s the tail of the owl. Make sure it is in the middle. Sew it up.
Then continue to sew the other section (the legs sections should be longer that the tail). Leave a small hole to put in the polyfill.

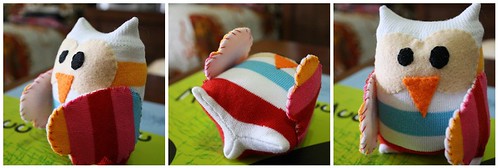
Turn the socks around. It should look like the first photo below. Fill with polyfill, then close the hole.
Here is that body of the owl. Just press the polyfill to shape it more like an owl.

Now, use some felt to cut the eyes and nose. I didn’t measure or draw a pattern. Just cut them free hand like the pattern in the photo. I embroider the black dots of the eye. You can also use buttons or brads, but I like to embroider because it is safer for children.
Sew the felt on the owl as shown in photos below.
Then (refer bottom panel of photos), cut 2 pieces of felt and 2 pieces of socks in another colour (you can also use fabric). Again, I didn’t measure or have a pattern. I just draw freehand shapes of wings.
Use simple stitches to sew the pink socks on the felt, then sew them on the sides of the owl.

Ones you have sewn the wings, the owl should look like the photo below. See the bottom of the owl… it is like “Y”.
Your owl is complete. Enjoy it!
Have a great day readers!


