Saturday, January 11, 2014

Baby shower after miscarriage

Hello Dear Readers,

I am currently enjoying pizza and a movie with my hubby. If you're a follower of my tumblr, then you'll know that I've gone to a baby shower today. Wanna see what I got? Watch this!


Don't feel like watching? That's okay, I'll show you everything I got right here. I'm even sweet enough to give you the links. 


I bought this letter J to hang on the nursery wall. My friend registered for it on Babies R Us.


I picked up this little guy from Carter's Baby. He was a complete hit! My friend's invitation had a yellow elephant stamped on it, so I assumed that she was going for an elephant theme. Thankfully I was right. 


I hit Old Navy the other day and picked up this fleece blanket. It's perfect for a boy and the hearts remind him that Mommy loves you!


Lastly, I picked up this cute baby boy's one-piece. I just love the little monster on the front and I think that my friend did too. 

Stay tuned to see the vlog and baby shower photos.

Night, night!

Tuesday, January 7, 2014

DIY: Bulletin Board Border


Hello Readers,

I felt like doing a DIY project today and if you're a teacher then you're in luck!
Today's' project is perfect for any teacher, teaching any age, and any topic!

Teacher's don't get paid much and that's okay. 
(we'll...it's really NOT okay but we don't do it for money)
We do it because we love our students and because we are super passionate about their futures. We also love freebies or anything cheap that can really add to our classroom's pizzazz. 

Teachers, I give you... wrapping paper border!

You'll need:

- wrapping paper (get it on sale!)
- scissors
- a pen
- a laminator (most schools have one)
- a piece of an existing border (you can even borrow one)


So you'll want to get your hands on a piece of existing border. You really don't need much and you can even design your own pattern if you're feeling super.


Grab your wrapping paper and start tracing your pattern.
(tip: buy wrapping paper off season when it's 75 percent off)


By the way, check out this cute Christmas wrapping paper I'm using. It's so terribly charming with the little reindeer out on their holiday shopping, and the little Santa is picking up his Christmas tree. Soooo cute! I love how they drive their little cars around in a winter wonderland.


Cut out your border and laminate.

This is super important. Laminating makes your border really shine and you'll keep it for years! If you're going to go to all the work of cutting that bad boy out, laminate him.

Most school have a laminator, and some office supply stores give teacher discounts. 
Do a little research and when in doubt, pull out the teacher ID. You'll be surprised at how many places give teacher discounts.

After you're done cutting out your beautiful handmade border there are two options left.

One. Leave your border as is and mount it in a flash

OR


Two. You can layer your border. I made this border out of spring themed wrapping paper and added a baby blue ribbon along the edge. The extra step just makes the border pop even more.

I hope that you try this DIY. You'll have something totally unique in your classroom and I would love to post your photos on the blog!

E-mail them to me at brittany_girr@hotmail.com. 

I can't wait to see what you make. 


Monday, January 6, 2014

Sewing Inspirations Gone Wrong

Hello Dear Readers and Happy New Year!

My husband and I set up a little sewing station for me over our Christmas break and I can't wait to show it to you. I just have a few more touches to do and then I'll need to take some nice photos to upload. 

My sister-in-law and I would just love to do a craft show this year. We decided to give our table a circus theme so I've been scouring all over Pintrest for some inspiration. 

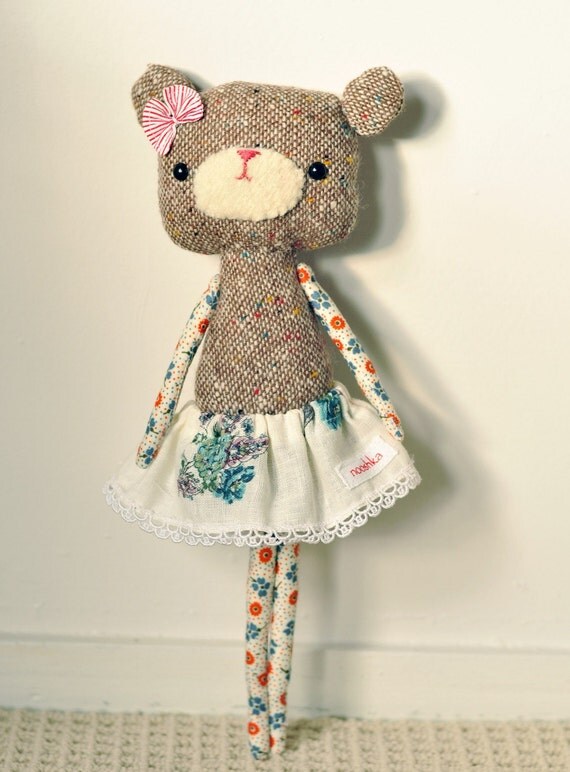
I came across these sweet bears and I thought that I could modify them into circus bears with cool, fluffy collars and hats. 


I love the idea of using small scraps of fabric to jazz up an ordinary plushie, so this is what I ended up with.


She's not at all what my diy pattern looked like. Her ears aren't nice and round and her legs are lopsided. Her face is too big. I pretty much gave up when it came to the collar and just threw together a skirt. I added an old bracelet as a necklace and sat Mrs.Ugly Bear on my shelf while I contemplated my work.

(same bear, different background)

I brought her to a woman (very much skilled in sewing) to critique and show me where I went wrong. To my surprise, she loved the bear. She said it was like art and very crafty and creative. I tried pointing out my flaws to which I got "Oh hush! She looks wonderful!"

I am definitely going to try again, and hopefully next week I'll have a real circus bear to show to you all. 

Goodnight!

(in Montreal for Christmas)

Sunday, December 15, 2013

Sock Monkeys


Christmas is only days away!!! 

Are you excited!?

I honestly don't have the time to be excited. Most of my time and thoughts are currently being taken over by crochet hooks, sewing needles, paint, buttons, thread, and glue guns. 

(and all of the injuries that go along with them)


I absolutely love giving away homemade gifts. There's so much thought and time that goes into something handmade and it's extremely budget friendly. I do admit that this year has been slightly overwhelming with the mountain of gifts I've decided to make but I'm just trucking along all merrily. 


My sweet, sweet Mike has tried to help me with some of these handmade gifts. He's been a big help.
 Too bad the guy can't sew or crochet yet. Maybe I'll teach him how in 2014? Mike, add that to your new year's resolution K?

Just kidding. I'll just start even earlier next year. 
(yeah right!)

I do want to show you one gift that I made this year. Others can be shown after the wrapping paper has been torn away.


See these awesome socks? I got them for under a dollar a pair off of Amazon.com. You can find the exact socks I used by clicking here.You can chose from over 20 colors!

And what did I make with them you ask? Well sockmonkeys of course!


How many did I make? Well let's just say that every one of my preschool students will get one, and I have a total of 9 students. That's 99 cents and 2 hours of sewing per student. I've been a busy, busy girl.


The boys get the blue monkeys and the girls get the green and pink monkeys. I actually had a parent ask me NOT to give his daughter something covered in pink. 

Each monkey is given a unique bow so I can tell who's is who's. No fighting over "that's my monkey!" "not it's mine!". Ha! I have it all on a list in my desk! Take that kids!

I won't show you how to make them since there are plenty of good sock monkey tutorials out there, like this one.


Are you giving anything handmade this year?

What's the best handmade gift you've ever received? 

Leave a comment below and share the Christmas Spirit!

Sunday, November 17, 2013

DIY: Christmas Photo Backdrop


Good Sunday Morning Dear Readers!

I know that Christmas is next month, but we preschool teachers like to plan ahead! I've got a December calendar that I need to get out to parents as soon as possible. We like to add pictures of the kids on calendars so I'm always looking for a creative way to "shoot" my kids.


So first I got a bunch of colored Christmas lights and a white blanket.


I grabbed my big kitchen playset that I have in my classroom and lightly duck taped on the blanket. I then use masking tape to hang my lights.


I taped them to the top of the kitchen, then down on the carpet, then back up again on the kitchen, then down again on the floor.


I made a little X on the floor so my kids knew where to sit when I took their picture.


I turned off the lights and this it the effect I got. The kids were mesmerized by the lights and I got some pretty sweet smiles. Because of obvious reasons, I can't show you their faces but I can give you a glimpse at what they look like.


I zoomed in on their faces and voila! Beautiful Christmas photos for their families to cherish.

Saturday, November 16, 2013

Preschool Fall Activity: Friendly Scarecrow


Happy Saturday Morning Readers!

I can't wait to share this preschool activity with you!!!!
It's perfect for little ones and my kids found it to be so terribly exciting!


First, I found some clothes in a back room of our preschool and I both taped and stapled a long sleeve shirt to a pair of pants. I did this with the clothes inside out so the kids wouldn't get stabbed.


Then I made a little head out of a paper bag, shredded recycling paper, and a pompom. I twisted the end and secured it with a rubber band. We're leaning about triangles right now so I gave him triangle eyes made from a 3x5 card.

I drizzled glue all over his head and stuck him in a bucket, head first, of yellow shredded paper.


The day before I got help from a volunteer parent in the office and shredded a big box full of recycling paper.
This didn't take long since the shredder was already almost full of paper already.


I can't show you my kid's faces so enjoy these artificial smiles! Trust me, they were all beaming!


They LOVED making a BIG mess all over the floor and they wouldn't stop giggling while stuffing the arms, legs, and body.


A little teacher assistance was needed near the end but the kids did a great job stuffing this guy full of paper.


Of course this made a big mess and I had to vacuum up a ton of paper...


And here's our finished product! 
I attached the head by squeezing the neckline of the shirt around the "neck" of the paper bag. I secured it with those twisty ties you use for trash bags.


I stuck on some gloves and socks (slightly stuffed with paper) and secure them with little rubber bands. We dressed him up with a winter hat and tapped on a pair of glasses.


He turned out really well! We'll take a vote and give him a proper name on Monday.
I can't tell you how many times I turned to say something to our scarecrow thinking it was a student.

This was a super fun fall project for my preschoolers and it was budget friendly! Let me know if you make one too! E-mail me a photo and I'll post it on the blog!

brittany_girr@hotmail.com.

Happy Fall!


Friday, November 15, 2013

A Little Goes A Long Way

Happy Friday Afternoon Readers!

I love my job, but I can't tell you how happy I am that it is Friday. Sleeping in, crafting, and blogging are all that I want to do right now. Any teacher would tell you that the weekend is a blessing from the Lord. It gives us all a chance to catch our breath before the next round. 
(yeah, sometimes it's like running a marathon) 

Anyways, I wanted to share a little something that happened to me this week. I really needed some encouragement because of this and that and God seemed to work things in my day that brought my smile back. 

I have a few ESL students at preschool and I love them to death. One little sweetheart came from Turkey and I've been trying to build a relationship with her and her family ever since she enrolled. She wears these beautiful head scarves/band things when we play outside. I asked her where she got it and she said "My grandma!" 

Later that week I saw her mother and who I thought was the grandma. They were all wearing the headbands and I just started a conversation with the mom. She speaks a little bit of English and is getting better and better every day. I mentioned the headbands and how much I admired them. I asked about the grandma who made them and explained that I crocheted too. 

Right then and there the mother took off her headband and put it on my head. She arranged my hair and the band and told me to look in the mirror. After I complimented the headpiece and started taking it off she said "No, for you." 

I fought so hard to keep the tears from flowing. This mother was so selfless and gave me HER OWN headband at the drop of a hat. (ha ha, see what I did there?) I was so touched and thanked her several times.
I've been wearing it every time I go out and I'm even wearing it now as I type.

It was just a little thing, but it meant so much.


Okay everybody, here's your homework.

Do one little, but nice thing for a teacher next week. Drop off a Starbucks drink (they're bogo right now!) or even a stack of stickers (we always need those)
Just do a little something sweet. You'll make their day, and maybe bring back their smile.